Monitor Tomcat with Splunk in RWS Development
Configure a Tomcat node on Ubuntu 22 with Jolokia for real-time Java monitoring using Splunk in the RWS development environment.
Projects:
c2platform/rws/ansible-gis
,
c2platform.mgmt
,
c2platform.core
This guide walks you through deploying a Splunk Enterprise server using Vagrant
and Ansible, specifically employing the c2platform.mgmt.splunk Ansible role,
on an LXD node running Ubuntu 22.04.1.
| Node | OS | Provider | Purpose |
|---|---|---|---|
gsd-splunk | Ubuntu 22.04.1 LTS | LXD | Splunk Enterprise (standalone) |
Ensure your RWS Development Environment is set up on Ubuntu 22, as outlined here .
Ensure the reverse/web proxy node gsd-rproxy1 is active:
vagrant up gsd-rproxy1
Refer to Create the Reverse Proxy and Web Proxy for more details. This node serves as the web and reverse proxy. It’s required for internet access to download the Splunk software and install packages. As a reverse proxy, it allows you to access the Splunk web interface using TLS/HTTPS without certificate errors.
Start the Splunk Enterprise server setup using Vagrant. This process should take approximately 1.5 minutes.
vagrant up gsd-splunk
To confirm the installation:
Open the
RWS Firefox profile
and go to
https://splunk.c2platform.org
.
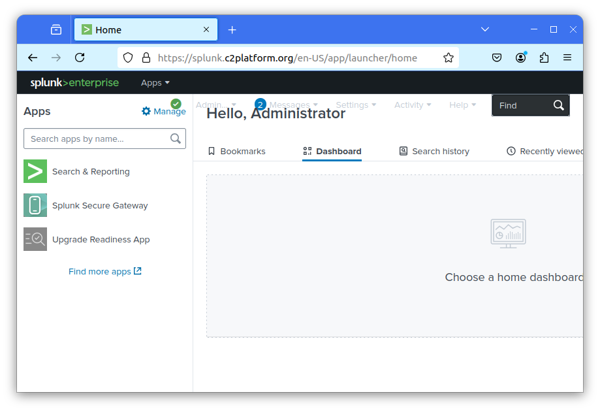
Log in as admin with the password Supersecret!. You should log in successfully
and see the Splunk Enterprise interface, as depicted below:

To test whether data can be sent to your new Splunk Enterprise node, provision
the Universal Forwarder on the Reverse/Web Proxy node gsd-rproxy1.
export PLAY="plays/mgmt/splunk_uf.yml"
vagrant provision gsd-rproxy1
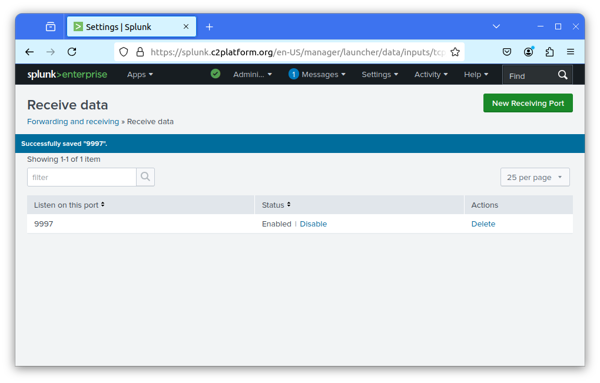
Use Splunk Web to configure Splunk to receive data on port 9997. Navigate to
Settings → Forwarding and receiving → Receive data → Add new and
configure port 9997.

Log in to the reverse proxy gsd-rproxy1 and set up the Universal Forwarder to
start monitoring /var/log.
vagrant ssh gsd-rproxy1
sudo su -
/opt/splunkforwarder/bin/splunk add forward-server gsd-splunk:9997
/opt/splunkforwarder/bin/splunk add monitor /var/log
/opt/splunkforwarder/bin/splunk restart
Show me
vagrant@gsd-rproxy1:~$ sudo su -
root@gsd-rproxy1:~# /opt/splunkforwarder/bin/splunk add forward-server gsd-splunk:9997
Warning: Attempting to revert the SPLUNK_HOME ownership
Warning: Executing "chown -R root:root /opt/splunkforwarder"
Added forwarding to: gsd-splunk:9997.
root@gsd-rproxy1:~# /opt/splunkforwarder/bin/splunk add monitor /var/log
Warning: Attempting to revert the SPLUNK_HOME ownership
Warning: Executing "chown -R root:root /opt/splunkforwarder"
Added monitor of '/var/log'.
root@gsd-rproxy1:~# /opt/splunkforwarder/bin/splunk restart
Warning: Attempting to revert the SPLUNK_HOME ownership
Warning: Executing "chown -R root:root /opt/splunkforwarder"
Stopping splunkd...
Shutting down.  Please wait, as this may take a few minutes.

Stopping splunk helpers...

Done.
splunkd.pid doesn't exist...

Splunk> Be an IT superhero. Go home early.

Checking prerequisites...
        Checking mgmt port [8089]: open
        Checking conf files for problems...
        Done
        Checking default conf files for edits...
        Validating installed files against hashes from '/opt/splunkforwarder/splunkforwarder-9.3.2-d8bb32809498-linux-2.6-x86_64-manifest'
        All installed files intact.
        Done
All preliminary checks passed.

Starting splunk server daemon (splunkd)...
Done
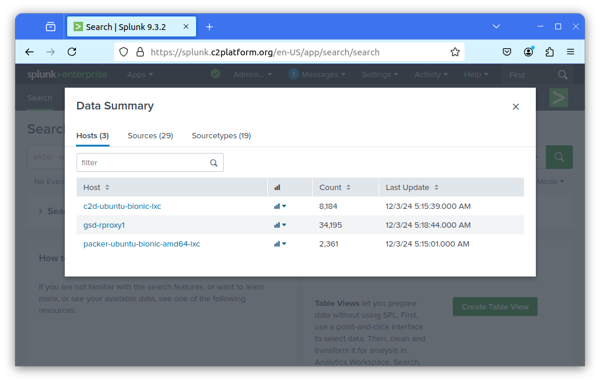
In Splunk Web, navigate to Search & Reporting, and click on Data Summary.
You should see under hosts that Splunk is receiving data from gsd-rproxy1.

The Ansible Play facilitates the setup of a Splunk Enterprise node with minimal
commands by integrating changes in the Ansible inventory project, which is also
a
Vagrant
project. This integration
simplifies the addition of services like Splunk Enterprise into the RWS
development environment. For detailed information, you can review the commit
34282de8
of the Ansible inventory project
c2platform/rws/ansible-gis
.
The commit included the following changes:
| Component | File | Comment |
|---|---|---|
| Vagrant | Vagrantfile.yml | Added splunk.c2platform.org as an “alias” for gsd-rproxy1. |
| Web/Forward Proxy | group_vars/reverse_proxy/files.yml | Added ports 8000 and 8089 to proxy.conf. |
| Reverse Proxy | group_vars/reverse_proxy/files.yml | Created new splunk.conf Apache configuration for splunk.c2platform.org. |
| Splunk | hosts.ini | Introduced 10 new groups for Splunk, e.g., splunk, splunk_clustermanager. |
| Splunk | group_vars/splunk*/main.yml | Configured those 10 new Splunk groups. |
| Splunk | group_vars/splunk_search/main.yml | Used variable splunk_resources to modify web.conf and added tools.proxy.on = True to enable access via a reverse proxy. |
The
Ansible Splunk Role ( c2platform.mgmt.splunk)
extends the mason_splunk.ansible_role_for_splunk.splunk. It imports this role
alongside the c2platform.core.linux Ansible role, offering enhanced
flexibility and power for managing multiple tasks. This includes configuration
in web.conf needed for accessing Splunk Enterprise via the reverse proxy. It
was created to leverage the flexible and powerful c2platform.core.linux role,
which provides access to 115 Ansible modules through a single resource variable
splunk_resources. This facilitates tasks such as modifying web.conf for
reverse proxy setup, allowing comprehensive management of Splunk Enterprise
settings.
Configure a Tomcat node on Ubuntu 22 with Jolokia for real-time Java monitoring using Splunk in the RWS development environment.
Was this page helpful?
Glad to hear it! Please tell us how we can improve.
Sorry to hear that. Please tell us how we can improve.