Setup SOCKS proxy
Categories:
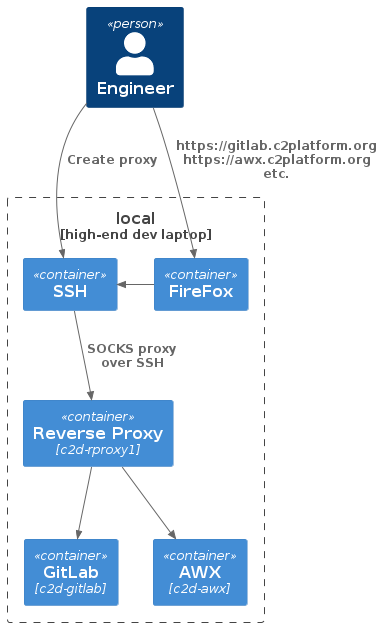
This how-to guide explains how to access the development environment using a
SOCKS proxy
,
which offers an alternative method for accessing the environment via a web
browser. This is an alternative to using the default simple HTTP(s) forward
proxy, as described in
Create the Reverse Proxy and Web Proxy
and
Configure a FireFox Profile
.
The SOCKS proxy is established through an SSH connection to c2d-rproxy1 and
provides more advanced protocol support beyond just HTTP and HTTPS.
Prerequisites
Create the reverse and forward proxy c2d-rproxy1.
c2
unset PLAY  # ensure all plays run
vagrant up c2d-rproxy1
For more information about the various roles that c2d-rproxy1 performs in this project:
- Setup Reverse Proxy and CA server
- Setup SOCKS proxy
- Managing Server Certificates as a Certificate Authority
- Setup DNS for Kubernetes
Overview
SSH Configuration
To set up the SOCKS proxy, add the following section to your .ssh/config file:
Starting the SOCKS Proxy
Now, you can start the SOCKS proxy using the following command:
ssh c2d_socks
Creating a Firefox Profile
Similar to Configure a FireFox Profile , create a Firefox profile. However, configure the Network Settings as shown below:
| Property | Value |
|---|---|
| Automatic proxy configuration URL | https://gitlab.com/c2platform/c2/ansible-inventory/-/raw/master/doc/howto-socks-proxy/c2d.pac |
| Proxy DNS when using SOCKS v5 | ✔ |
| Enable DNS over HTTPS | ✔ |
Verification
Navigate to https://c2platform.org/is-alive . If everything is set up correctly, you should see the following message, and there should be no security or certificate warnings since the certificate should be trusted:
Apache is alive
Feedback
Was this page helpful?
Glad to hear it! Please tell us how we can improve.
Sorry to hear that. Please tell us how we can improve.