NodeJS OpenShift Example Application and Pipeline ( NJ )
Categories:
GitLab: c2platform/examples/nodejs-openshift
This project demonstrates a GitLab CI/CD pipeline to OpenShift. This project assumes you already have an OpenShift instance available similar to How-to CodeReady Containers (CRC) . The pipeline builds and publishes images to the Container Registry of this project. This project also contains OpenShift manifest files for managing two environments / projects / namespaces in OpenShift for this simple application. This project also has a simple Robot Framework test.
Overview
The pipeline, as defined in .gitlab-ci.yml
, builds and publishes images to the Container Registry
of this project. The image contains a very simple NodeJS application that responds with a “hello” message that includes the image version. For example when accessing the “production” environment using URL https://frontend-njp.apps-crc.testing/ it will respond with message similar to:
Hello World! Version: 0.1.3
The pipeline has five stages:
- Prepare: This stage retrieves the version number from
package.jsonand adds it to thevariables.envfile as variableC2_VERSION. Thevariables.envfile is then stored as an artifact so it can be used by later stages. - Build: This stage pulls the latest image from the GitLab registry and builds a new image with the current commit information. The built image is then tagged with the commit SHA and pushed to the GitLab registry.
- Release ( manual on master ): This stage creates a release in GitLab only when triggered manually on the master branch. The name, description, tag name, and ref of the release are determined using the variables
C2_VERSION,CI_COMMIT_SHA, andCI_PROJECT_TITLE. Note: the creation of a Git tag, will run the pipeline again. - Docker: This stage tags the master branch as “latest” and any Git tag as the corresponding “tag name”.
- Deploy ( manual on tags ): This stage deploys the tagged image to production only on Git tags. This technically done by tagging the image with a
productionlabel. The “production” environment is configured to only use the image tagged with this label see manifests/production.yml . - Test: this stage runs a simple Robot Framework
test of the NodeJS application running in OpenShift / CRC. See test/chrome.robot
and test/firefox.robot
.
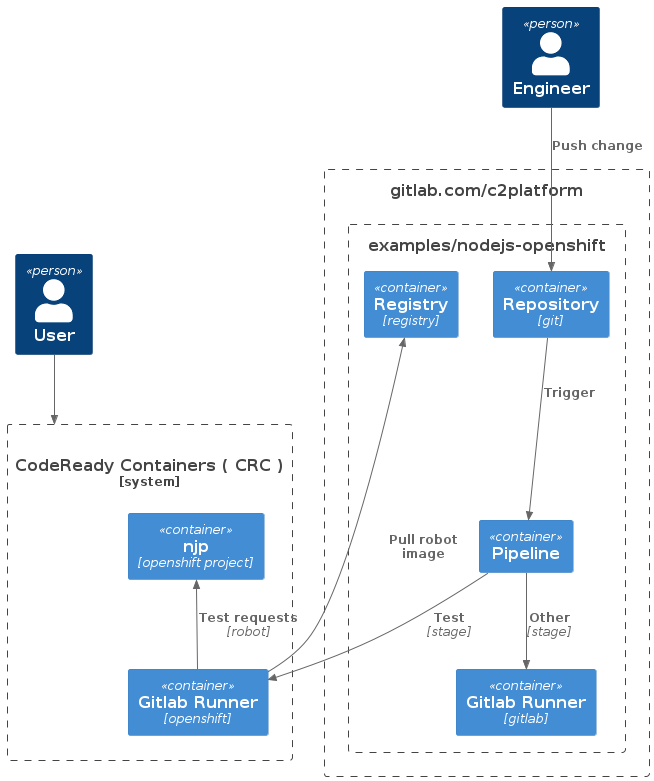
GitOps
This example project uses GitOps workflow to manage OpenShift resources in two namespaces nja and njp. The first namespace is for is the “acceptance” / “staging” environment, the second for “production”. See manifests/staging.yml
and manifests/production.yml
. The diagram below only shows njp. The setup for nja and njp is identical with the exception of the fact that njp is configured to pull only images with tag production.
The sequence diagram below illustrates the GitOps workflow in more detail. The setup in this project is based on the example project GitLab-examples / ops / GitOps demo / k8s-agents - GitLab Agent demo configuration · GitLab and on the guidance in Using GitOps with a Kubernetes cluster .
@startuml

participant D as "Developer"
' participant A as "Application repository"
' participant M as "Manifest repository"
participant G as "Git repository"
participant K as "GitLab agent"
participant O as "OpenShift"

' D -> A : Pushing code changes
D -> G : Pushing manifest changes
' A -> M : Updating manifest
loop Regularly
K -> G : Watching changes
G -> K : Pulling changes
K -> O : Applying changes
end

@enduml
Note: This example uses a single repository for both OpenShift manifest files and application code ( including the Dockerfile ). In real world setup it would make more sense to have a separate repository for the manifest files and than to have one or more repositories with pipelines push manifest changes. It would also make sense to use a tool like Kustomize
as is the case in the GitLab-examples / ops / GitOps demo / k8s-agents - GitLab Agent demo configuration · GitLab
.
Robot
Gitlab Agent
When using OpenShift CodeReady Containers ( CRC ) as described in How-to CodeReady Containers (CRC) you can install the Gitlab Agent by using the operator that comes pre-installed. This section however describes the manual install. After installation the agent will create two namespaces and deploy the application.
Install Helm
To install the agent in OpenShift we will need Helm . This can be installed with the following command:
See also Helm Quickstart Guide
Register GitLab agent
See Installing the agent for Kubernetes | GitLab .
First step is to create an agent file. See gitlab/agents/c2-openshift/config.yaml .
With config.yaml created and pushed to the repository, the agent can be registered. In Gitlab.com navigate to Infrastructure → Kubernetes cluster
and select Connect a cluster. Select the agent ( c2-openshift in our example ) and register it. This will output some helm commands that we need to execute to install the agent in OpenShift.
Install GitLab agent
The agent is then installed by running commands similar to below. Note: the exact command and the token are shown when you register the agent. On OpenShift we require some extra settings that are passed using a YAML file gitlab-agent.yml.
helm repo add gitlab https://charts.gitlab.io


helm repo update
helm upgrade --install $AGENT_NAME gitlab/gitlab-agent \
    --namespace gitlab-agent-$AGENT_NAME> \
    --create-namespace \
    --set image.tag=v15.9.0-rc1 \
    --set config.token=$TOKEN> \
    --set config.kasAddress=wss://kas.gitlab.com \
    -f gitlab-agent.yml
The file gitlab-agent.yml
securityContext:
  allowPrivilegeEscalation: false
  capabilities:
    drop:
    - ALL
  runAsNonRoot: true
  seccompProfile:
    type: RuntimeDefault
Gitlab Runner
Navigate to Settings → CI/CD → Runners and get the registration token.
Operator Hub
onknows@io1:~$ oc apply -f gitlab-runner-secret.yml
secret/gitlab-runner-secret created
onknows@io1:~$
onknows@io1:~$ oc project nja
Now using project "nja" on server "https://api.crc.testing:6443".
onknows@io1:~$ oc apply -f gitlab-runner.yml
runner.apps.gitlab.com/gitlab-runner created
Commandline
For Helm3
export NAMESPACE=nja
export GITLAB_RUNNER_CONFIG=gitlab-runner-config.yaml
oc login -u kubeadmin -p whatever https://api.crc.testing:6443


helm repo add gitlab https://charts.gitlab.io


helm repo update gitlab
helm search repo -l gitlab/gitlab-runner  # available versions to install
helm install --namespace $NAMESPACE gitlab-runner -f $GITLAB_RUNNER_CONFIG gitlab/gitlab-runner
See GitLab Runner Helm Chart | GitLab .
onknows@io1:~/git/gitlab/c2/examples/nodejs-openshift$ helm install --namespace $NAMESPACE gitlab-runner -f $GITLAB_RUNNER_CONFIG gitlab/gitlab-runner
W0220 09:50:36.216589 2988057 warnings.go:70] would violate PodSecurity "restricted:v1.24": seccompProfile (pod or container "gitlab-runner" must set securityContext.seccompProfile.type to "RuntimeDefault" or "Localhost")
NAME: gitlab-runner
LAST DEPLOYED: Mon Feb 20 09:50:36 2023
NAMESPACE: nj-gitlab-runners
STATUS: deployed
REVISION: 1
TEST SUITE: None
NOTES:
Your GitLab Runner should now be registered against the GitLab instance reachable at: "http://gitlab.com"

Runner namespace "nj-gitlab-runners" was found in runners.config template.
Verify
In this project the technical abbreviation used for this project is nj. The two projects / namespaces / environments are derived from this. Acceptance / staging is nja and production is njp. The manifest files in this project will allow the application to be accessed using https://frontend-nja.apps-crc.testing/ and https://frontend-njp.apps-crc.testing/. See manifests/staging.yml
and manifests/production.yml
The environments should show something like
Hello World! Version: 0.1.3
Create release
To create a “release” change the version in package.json
to the version that you want to build for example 0.1.4. This will trigger a pipeline that you monitor via pipelines
.
https://frontend-nja.apps-crc.testing/
Deploy
Build and test image locally
The project can build and tested locally by executing the following command:
docker build -t nodejs:latest . && docker run -p 3000:3000 --rm nodejs:latest
The output can be verified by using the following command in the terminal or navigating to http://localhost:3000 in a browser.
curl http://localhost:3000

  # returns Hello World!
Pulling images
Images can be pulled using the following command:
docker pull registry.gitlab.com/c2platform/examples/nodejs-openshift:latest
Feedback
Was this page helpful?
Glad to hear it! Please tell us how we can improve.
Sorry to hear that. Please tell us how we can improve.